VRToon Shader Manager
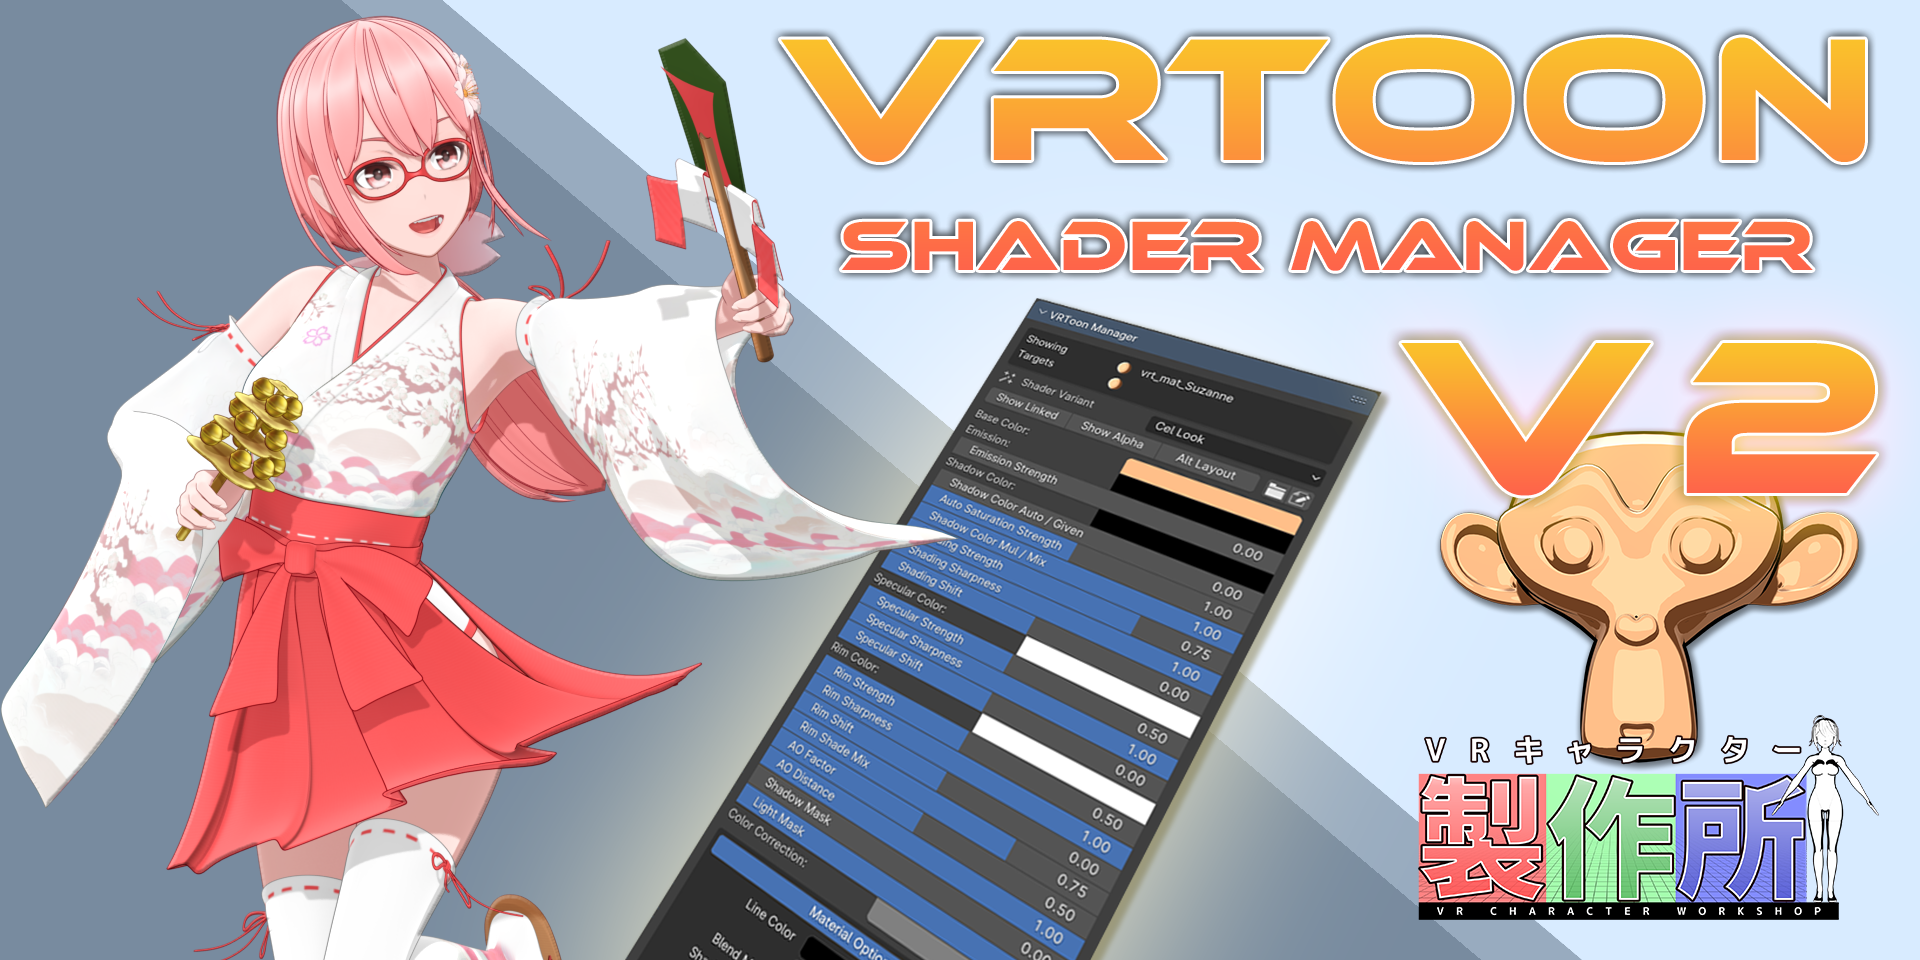
The ultimate NPR shading solution for Blender Eevee
Overview
The VRToon Shader Manager is a Blender add-on for introducing and managing the VRToon shader, an NPR shader node group for the Eevee renderer, into your scenes.
The VRToon shader is a shader node group carefully designed to achieve beautiful anime looks with minimal effort. By using this add-on, you can easily assign the VRToon shader or quickly adjust settings.
It comes with two variants by default: VRToon Cel-Look and VRToon Semi-Real, both of which can be easily implemented and adjusted.
Note
This addon is hugely upgraded from the former "VRToon Shader" add-on. It is now considered a completely new product, standing on its own.
Main Features
- Powerful and user-friendly NPR shader: The VRToon shader allows for a wide range of expressions, from anime-style cel looks to intermediate representations between anime and photorealistic, by simply adjusting parameters.
- Batch parameter setting: The shader manager enables batch manipulation of shading parameters across multiple objects.
- Quick setup: Implementing the shader is instant. It's also possible to batch convert existing materials to VRToon materials.
- Advanced outlines: As part of the VRToon manager functionalities, it's easy to set up striking back-face method outlines.
- Extensive extensibility: The generic design of the shader manager allows users to add new shaders.
- Support for Japanese and English: All functionalities support multilanguage in Japanese and English.
- Compatibility with Sakura Tools: The add-on for supporting NPR model production, "Sakura Tools," considers integration with the VRToon Shader Manager.
Installation
To install the add-on, follow the standard procedure for Blender add-ons.
- Download the zip file from BlenderMarket or Gumroad.
- Open Blender, go to
Edit>Preferences>Add-ons>Install.... - Select the downloaded zip file and click
Install Add-on. - Enable the add-on by ticking the checkbox next to the add-on name.
- The add-on will appear in the
3D View>Side Panel>VRToontab.
Notice
If you using former "VRToon Shader" addon, please remove it before installing this addon.
User Guide
Initial Setup
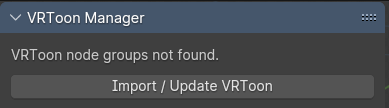
When the add-on is enabled, the VRToon tab will be displayed on the side panel. This tab contains the "VRToon Manager" panel, from which various operations can be performed.
However, until the VRToon shader is introduced into the workspace, only the "Import/Update VRToon" button is available. Clicking this button introduces the VRToon shader into the workspace, allowing it to be assigned to any material.
Note
Some of following screenshots are from Japanese UI. All elements of the add-on are also available in English.
Converting to/Manually Assigning VRToon Shader
To utilize the VRToon Shader Manager's functions, VRToon materials must exist within the scene. Initially, converting existing materials to VRToon materials is a good place to start. The appropriate operation can be completed instantly.
Converting
The "Convert/Update Tools" sub-panel contains buttons for converting materials included in the selected object to VRToon materials. Clicking this button converts all materials included in the selected object to VRToon materials.
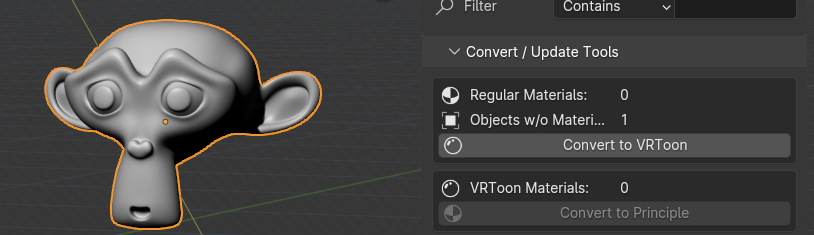
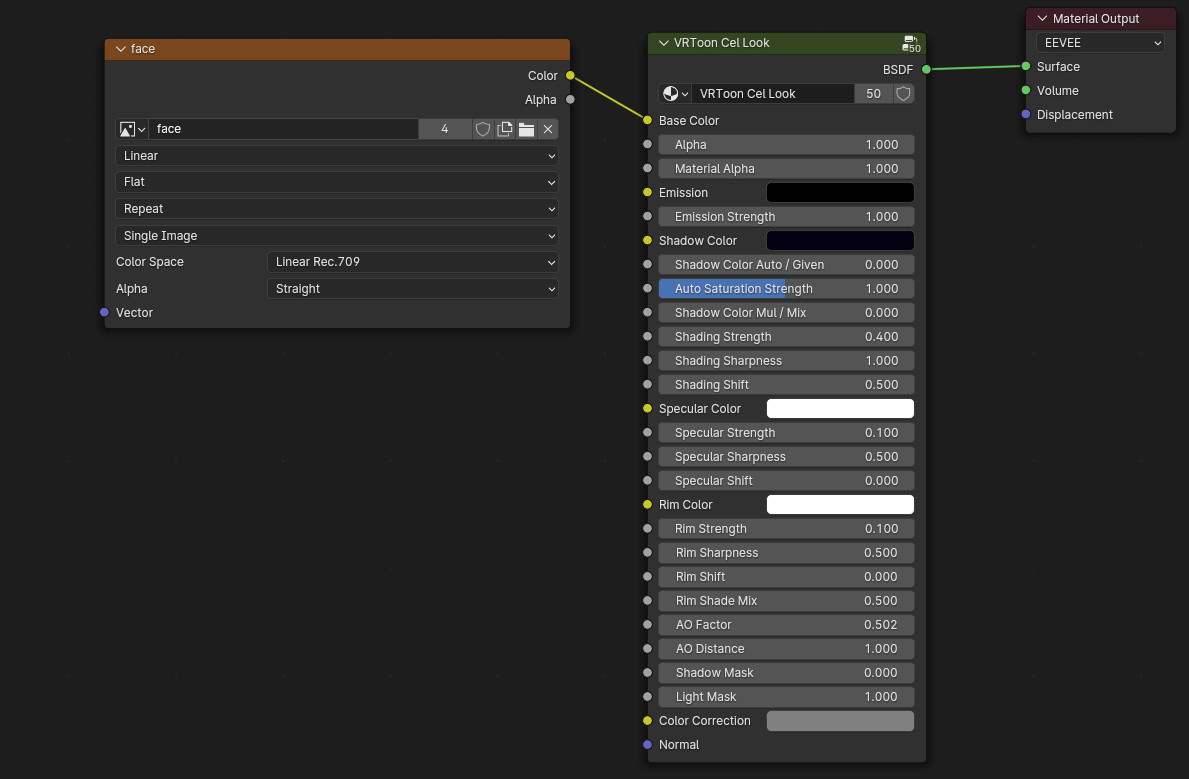
Conversion means replacing shader nodes connected to a valid material output ("All" or "EEVEE") with node groups of the VRToon shader variant. This operation is performed on all materials contained in the selected object.
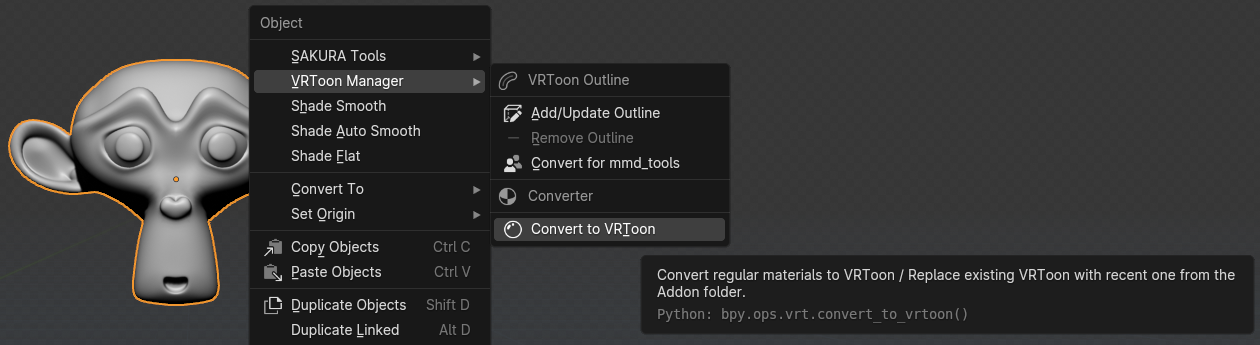
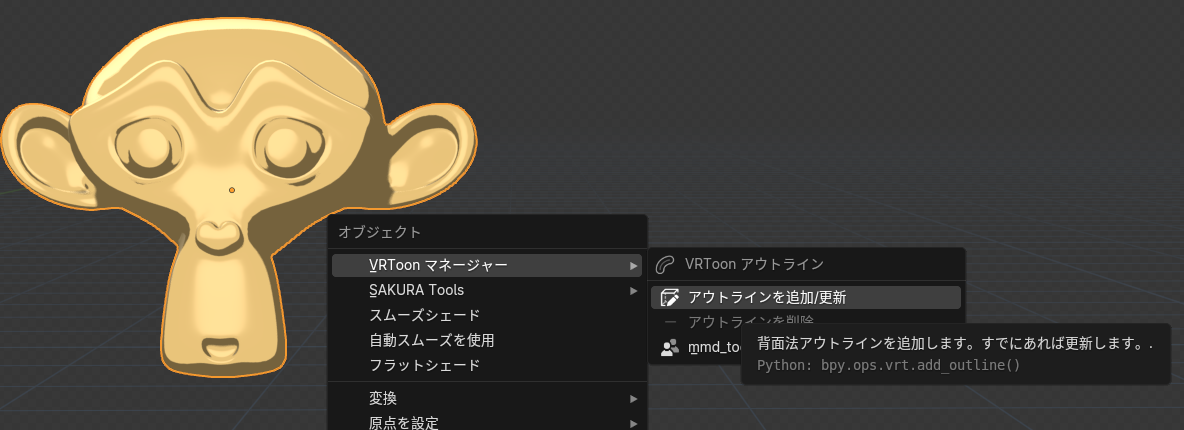
This operation can also be executed from the object mode's context menu W > VRToon Manager submenu.
Note
The converter will inherit the node connections of texture image nodes and parameters of each socket as much as possible from the original shader nodes. However, if the original shader node tree is complex, a complete reproduction may be difficult. Therefore, it is recommended to adjust the parameters of each material after conversion.
Materials can be processed in bulk by selecting an armature, allowing for quick NPR expression implementation on the entire character model at the initial use.
Manually Assigning
In the shader node editor, you can also directly assign the VRToon shader. From the new creation menu Shift + A, select Node Group > VRToon (Cel-Look) or VRToon (Semi-Real) to add it to the shader node editor. Then, by connecting it to the material's output node, the material will be treated as a "VRToon material" and can be operated from the manager panel.
While manual assignment is possible, it is generally faster and more efficient to convert existing materials. However, manual assignment may be appropriate if the original node tree is very complex or has a special structure.
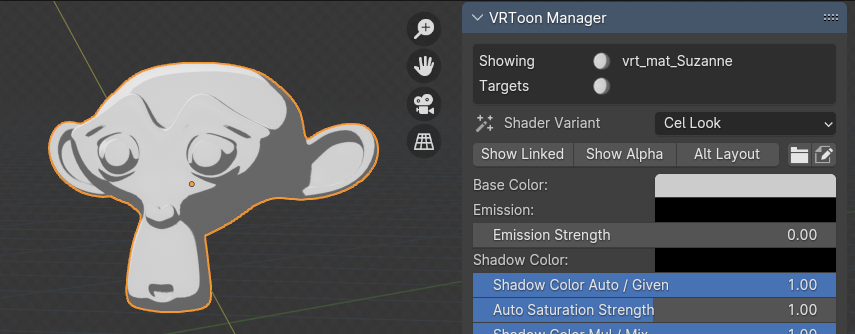
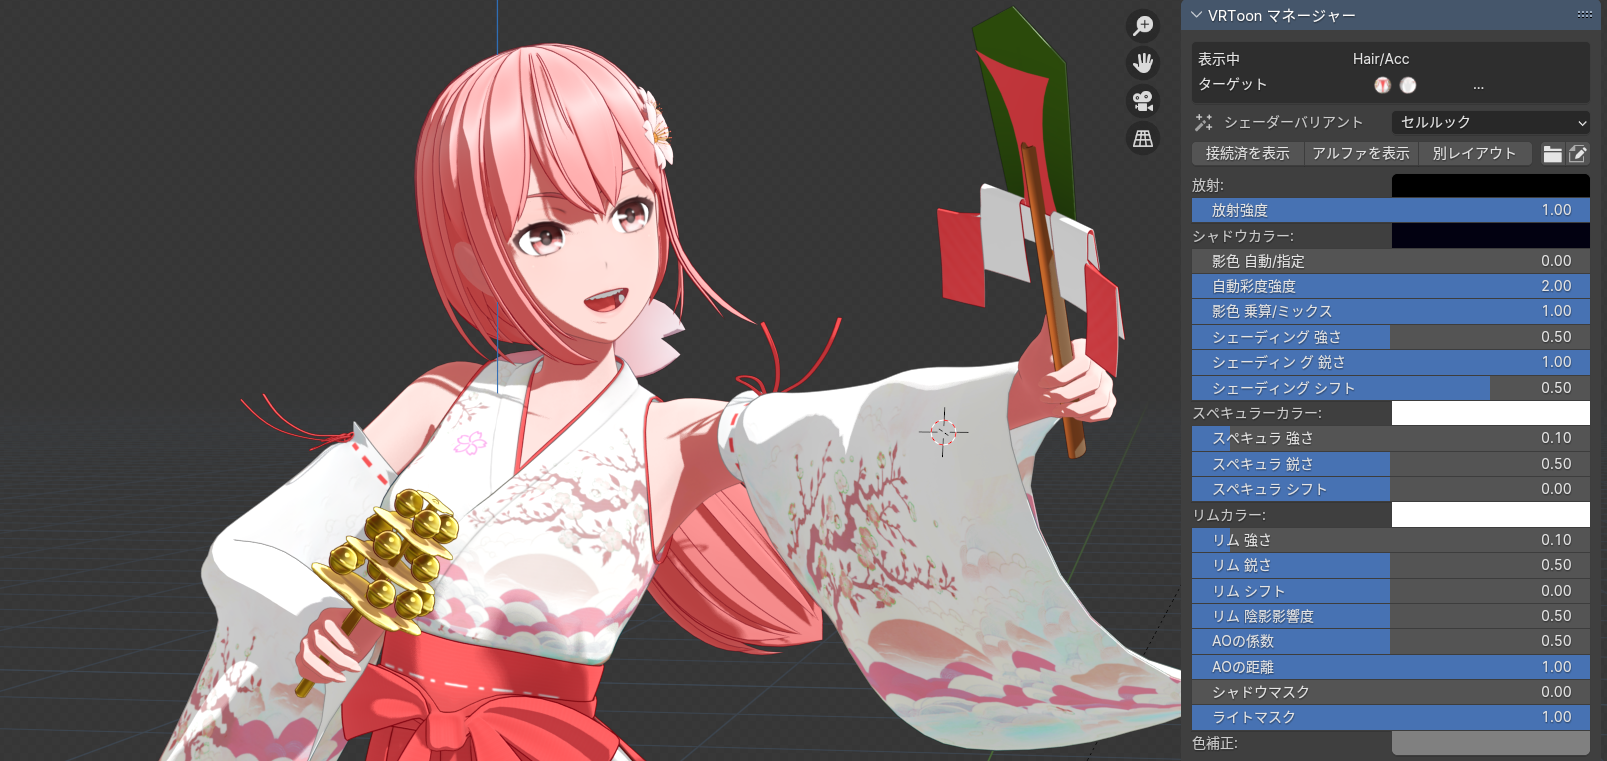
"VRToon Manager" Panel
This panel displays in detail the status of VRToon materials (materials to which any variant of the VRToon shader is assigned) contained in the currently selected object or model.
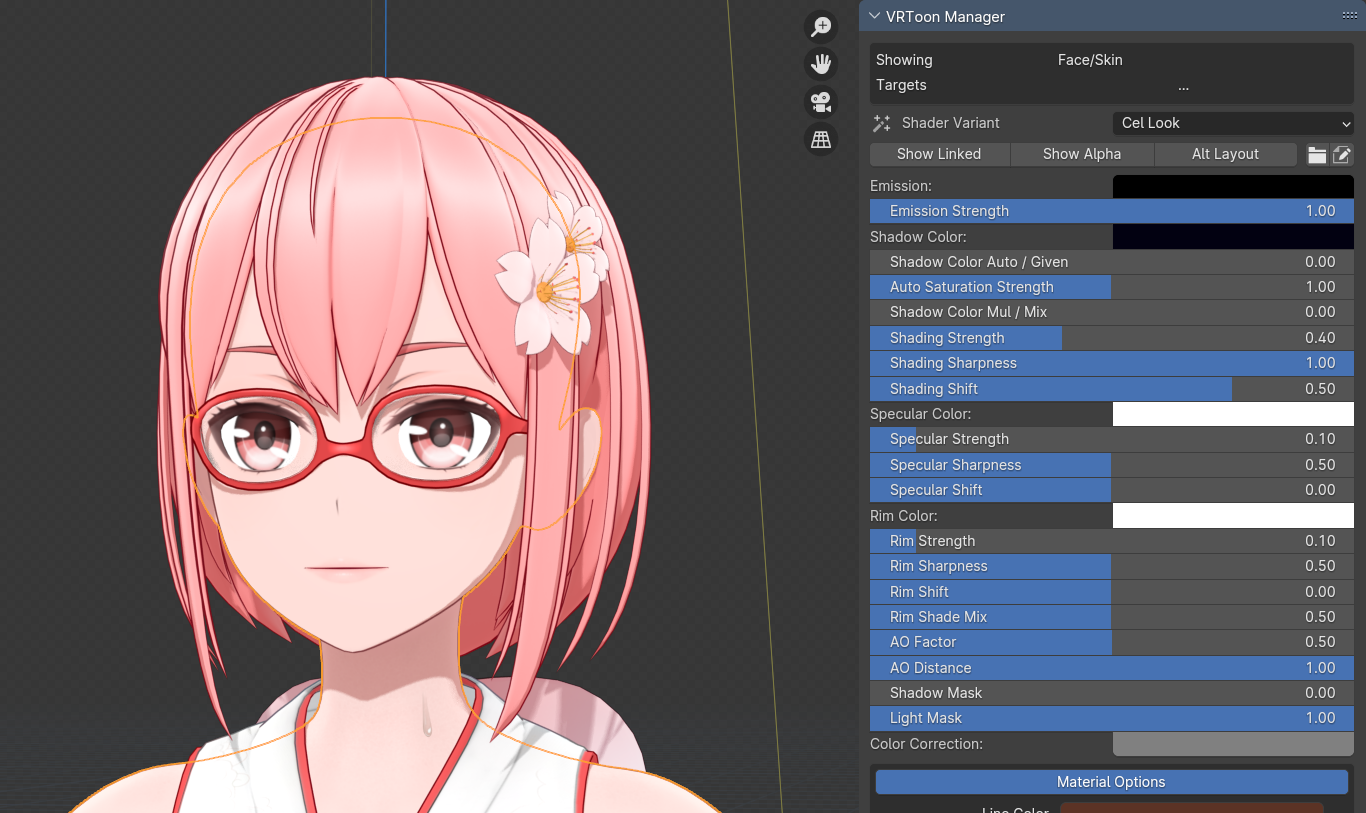
- Top
- Target overview. Icons of all materials (manager targets) contained in the selected object or model are displayed here. The materials displayed here are affected by operations on the panel.
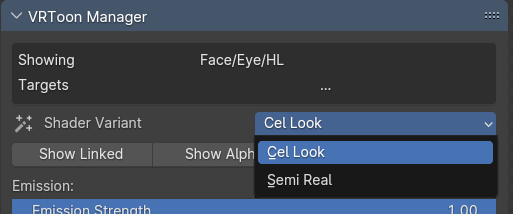
- Shader Variant
- A list of VRToon shader variants existing in the workspace is displayed here. From here, you can switch the shader variant assigned to the material.
- Parameter Panel
- Parameters of the active material are displayed here. Changes in this panel automatically propagated to all target materials.
- Material Options
- Adjustments such as FreeStyle line color and blend mode are possible.
Operations on this panel apply to "all" materials contained in the selected object. When an armature is selected, it applies to all mesh objects associated with that armature, i.e., the entire model.
By utilizing this feature, shaders can be applied to multiple objects or the entire model in batches, and parameters can be adjusted in batches to quickly achieve a consistent expression.
Parameter Operation
The parameter panel displays the parameters of the active material in an operable state. When an operation is performed, the change propagates to all target materials.
For example, if you want to adjust the shading intensity in bulk for a group of objects comprising the entire model, you can select all objects contained in the model or select the armature. This will adjust all mesh objects associated with that armature in bulk.
Refer to the following Excluding Materials from the Manager if you want to narrow down the target materials.
Tip
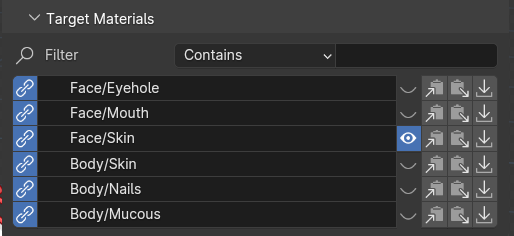
The "Target Materials" sub-panel displays the all materials contained in the selected object. By clicking the eye icon, you can change the active material which is displayed in the parameter panel.
Excluding Materials from the Manager
To protect a material from operations on the manager panel, click the chain mark button in the "Target Materials" sub-panel. This icon indicates that the material is "linked" to the manager.
Turning this off excludes that material from operations on the manager panel, maintaining its parameter state.
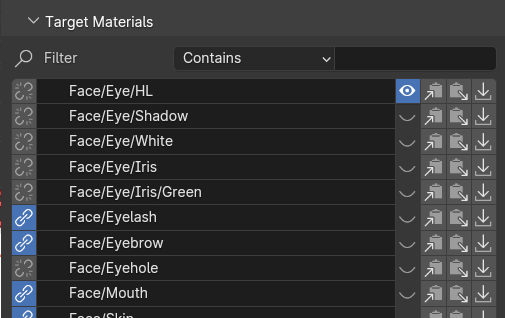
Excluding materials with special settings (such as the whites or pupils of NPR characters' eyes) allows you to adjust settings for other materials in bulk while retaining their unique configurations.
Saving and Loading Settings
Using the "Save" and "Load" buttons at the top of the panel, you can save the settings of the active material to a file or load them from a file. This enables you to carry over settings to another scene or share them with other users.
The file is in JSON format, and by default, the file name will use the material name, but you can also give it a custom name.
About Shader Variants
The VRToon shader comes with two standard variants: Cel-Look and Semi-Real. Each of these variants is designed for different expressions and comes with its own set of unique parameters.
- Cel-Look: This variant is designed to achieve an anime-style cel look, equipped with a powerful automatic shadow color generation feature. It supports shadows.
- Semi-Real: Aimed at achieving an intermediate expression between photorealistic and anime, this variant supports colored lighting. However, it might not work well with shadows.
Common Special Parameters
There are common special parameters unique to the VRToon shader. Here, we'll describe them using the Cel-Look variant as an example.

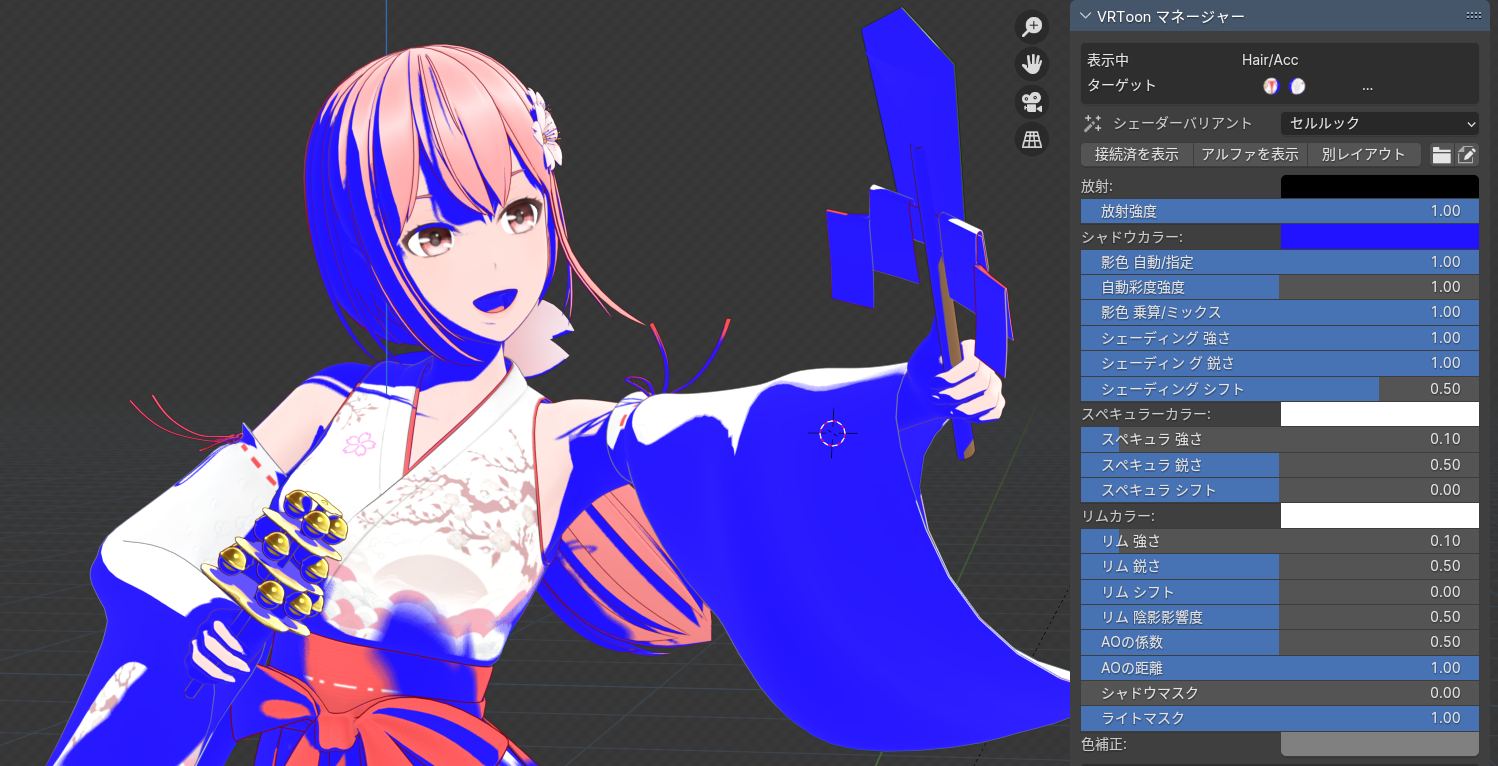
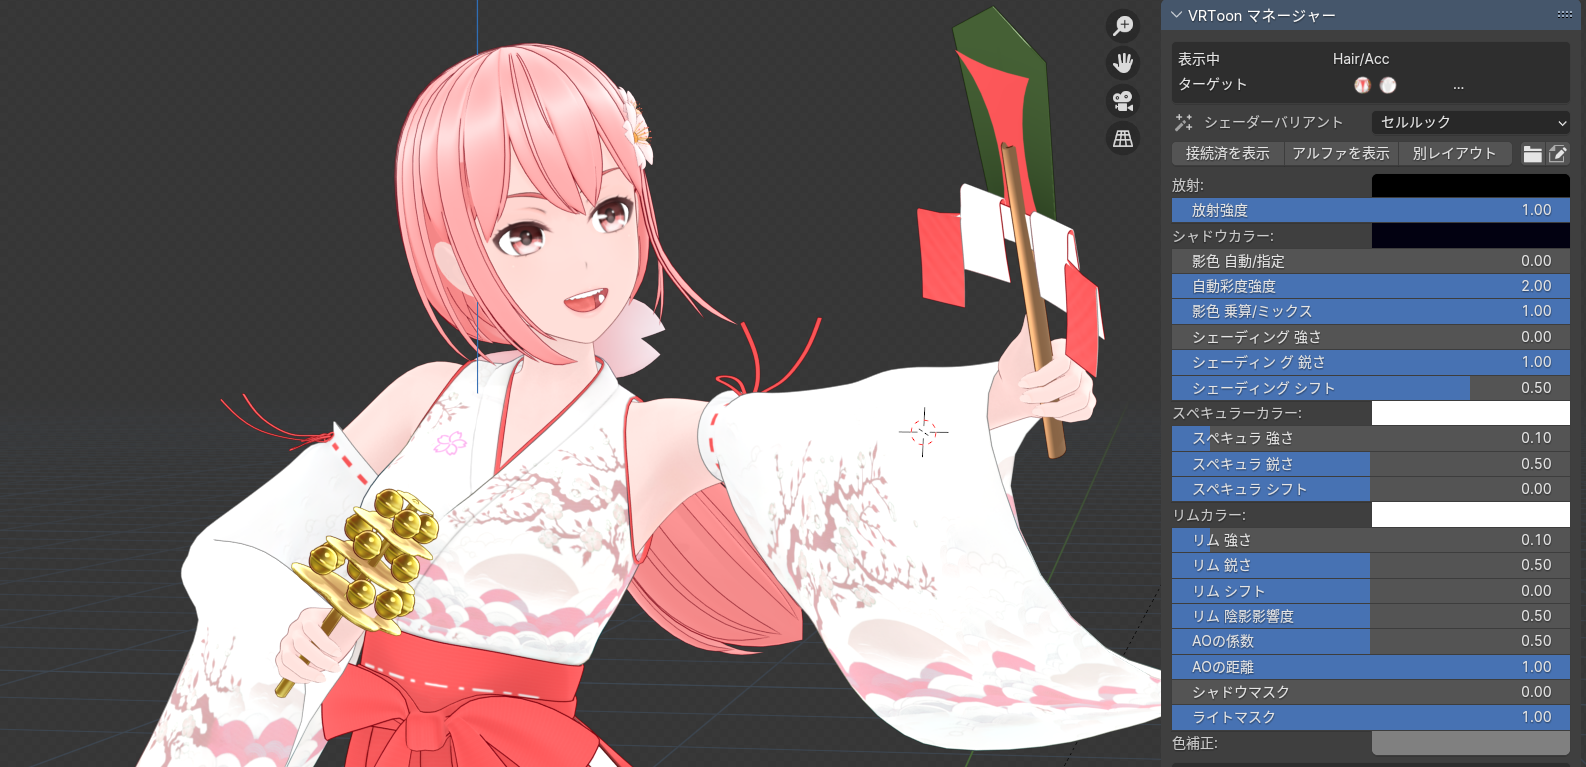
Shadow Color Auto/Specified
A value of 0.0 uses automatically generated shadow colors. The shadow color is generated by adjusting the hue, saturation, and brightness of the base color at the shading point using a specific algorithm, often resulting in ideal outcomes.
A value of 1.0 uses the shadow color specified in the Shadow Color parameter. This is used when you want to express unique colorations. Often, connecting a shadow color texture can achieve professional results.
Setting a value between these extremes generates a shadow color that is a mix between the automatic generation and the specified color.
Automatic Saturation Intensity
Specifies the strength of automatic saturation adjustment in the auto-generated shadow color. Normally, a value of 1.0 is adjusted to yield roughly ideal results.
Setting it to 0.0 results in only brightness changes being reflected in the shadow color, producing a somewhat desaturated, closer to photorealistic outcome. Setting it to 2.0 emphasizes saturation changes, resulting in a more vivid cel look.

Shadow Color Multiply/Mix
This applies when a shadow color is specified. In multiply mode, the shadow color is multiplied onto the base color. In mix mode, the shadow color is mixed with the base color. Use mix mode if you want to fix the shadow color to a specific color.
Shading Strength, Sharpness, Shift
These parameters adjust the basic ways shadows are applied.
Increasing strength makes the shadow color darker, approaching black.
Increasing sharpness makes the boundary of the shadow color sharper, resulting in a more cel-like outcome.
Adjusting the shift allows you to modify the boundary between the lit and shadowed parts.
Note
Even if you increase the shift to the maximum, parts that are not hit by light at all (the opposite side of the object or parts shaded by other objects) will remain in shadow color. If you want to lighten those areas as well, you should reduce the strength itself or use Shadow Mask.
Specular Color, Strength, Sharpness, Shift
Generates stylized specular highlights, not photorealistic ones. Adjusting color, strength, sharpness, and shift allows for flexible expressions.
Rim Color, Strength, Sharpness, Shift, Shadow Influence
Generates rim lighting. Adjusting color, strength, sharpness, shift, and shadow influence allows for flexible expressions.
Also, by adjusting the shadow influence, you can prevent or emphasize the rim light on dark parts.
AO Coefficient, AO Distance
These parameters are intended to adjust the strength and range of ambient occlusion effects on a material basis if ambient occlusion is enabled in the scene. Since AO tends to generate soft shadows in intricate areas, reducing the AO coefficient and adjusting the distance can help achieve a crisper cel look.
Shadow Mask
By "lifting" the parts that become shadowed in the lighting result, you can prevent those parts from becoming shadowed. It's used to weaken the shadows on self-illuminated parts or prevent shadows from forming on faces, for example.
Light Mask
By "suppressing" the parts that do not become shadowed in the lighting result, you can forcibly make them shadowed. For example, connecting an AO texture can emphasize shadows on details not sufficiently provided by the geometry.
Note
There are also parameters unique to each variant. For specific effects, please experiment with different settings.
Changing Shader Variants
For materials already assigned the VRToon shader, you can easily switch variants via the manager panel.
From the dropdown menu at the top of the panel, select the variant you want to use. This action changes the VRToon shader variant assigned to the material. Settings compatible between variants are automatically carried over.
Furthermore, when switching variants, all parameters before the switch are saved to the material. Therefore, reverting to a previous variant restores the original settings.
Note
Unused variants will be removed from the workspace. If you don't see the variant you want to use in the list, Click the Import/Update VRToon button to add it.
Adding Shader Variants
Adding new shader variants is straightforward.
Each variant is saved as a blend file in the /data/ folder within the addon's installed directory. The VRToon Shader Manager loads these blend files from this folder upon startup or when the "Import/Update" button is clicked.
Each variant must be a node group starting with VRToon. The name following VRToon will be the variant's name. For example, the standard variants are VRToon Cel-Look and VRToon Semi-Real. The name after VRToon appears as the name on the manager panel. Parentheses in the name are ignored.
Adding a variant involves creating this blend file and a node group starting with VRToon. After adding, restart the addon or click the "Import/Update" button to add the new variant. Modifying standard variants to create your preferred shader is also a good approach.
Debugging Shaders
While creating and testing shader variants, entering C.scene['vrt_debug_tgt_all_objs'] = True in the Python console makes all objects always subject to manager operations. This facilitates shader testing.
Adding Translations for Variants
Input and output names of sockets in the shader node group are translated for standard variants within the addon. However, if you want to provide translations for your custom variants, create a new translation file.
The addon automatically loads translation files for each locale from the /translations/ folder within the addon's installed directory. By default, Japanese translation files are placed in the ja_JP folder.
Translation files are tab-separated text files, with each line containing the original text and its translation. For details, refer to the files provided as standard.
Additional Features
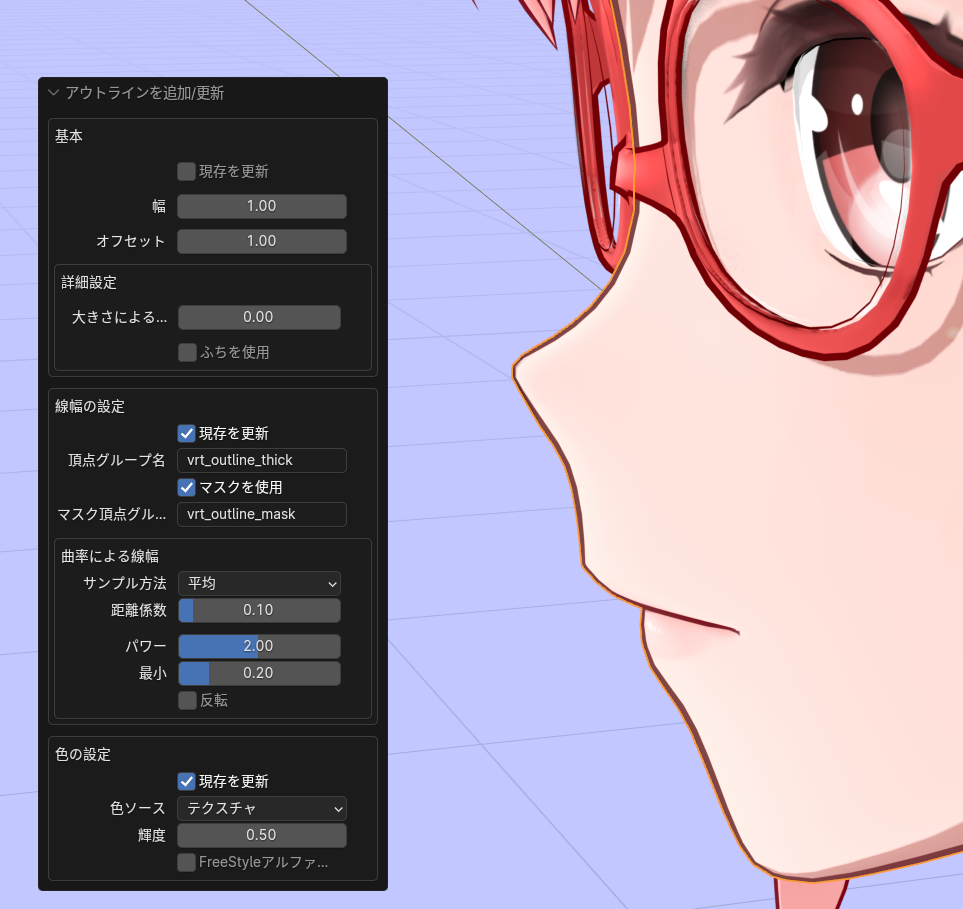
VRToon Outlines
This is a feature for adding high-functionality flipped-normal outlines to objects. Clicking the "Add/Update Outline" button adds an outline using the solidify modifier to the selected object.
Flipped-normal outlines render much faster than FreeStyle outlines or grease pencil outlines and often yield sufficient results. Due to its customizable nature, the VRToon outline allows for various settings for line width, line color, etc.
- Line Width Control for Emphasis: By default, the line width is set according to the mesh shape (surface curvature), reproducing beautiful touches similar to manga or anime. Manually adjusting the vertex group (default
vrt_outline_thick) also allows for line width control. - Rich Outline Color: You can specify outline colors in various ways, using textures, specified colors, or FreeStyle line colors.
- Easy Reconfiguration: If the outline is no longer needed, it can be easily removed. However, line width and settings are saved, allowing for reuse when added again. It's also possible to update only certain settings.
- Scaling by Model Unit: The line width of the outline can be set with a scale offset per model, consisting of multiple objects. This allows for consistent outlines across models of different scales in the scene.
- MMD Compatibility: You can convert to mmd_edge_scale, used for line width during mmd_tools export, with one click.
- Access from the Context Menu: You can quickly add, delete, or convert outlines for the selected object from the context menu.
Outline settings can be conveniently accessed by selecting the target object and using the object context menu W > VRToon submenu. The same menu allows for the deletion of outlines and conversion for use with mmd_tools.
When the operator is executed, an operator panel with numerous options appears, allowing for detailed adjustments to the outline settings.
In the "Reconfigure Mode" activated when applying the same operation to an object with an existing outline, the operator options include a "Update Existing" checkbox for each element. Turning this on updates the corresponding elements, allowing for updates of necessary parts only while retaining individual element settings, such as line width and color.
For instance, you can update only the line width settings after editing the shape of a mesh object.
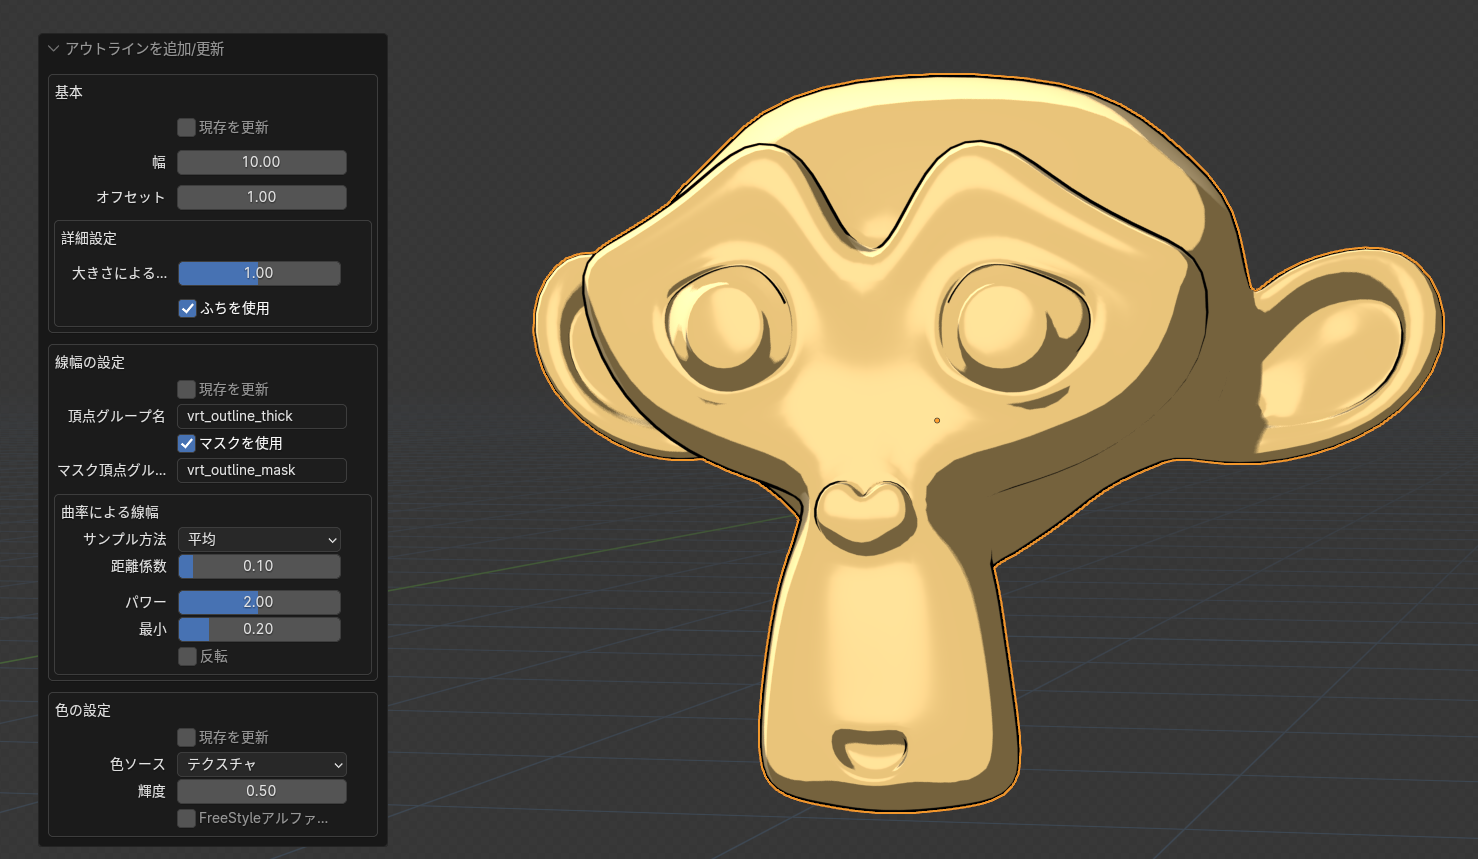
Basics
Sets basic parameters for the solidify modifier used for outlining.
Line Width Settings
Line width per vertex is controlled by the specified vertex group (default vrt_outline_thick).
Turning on "Use Mask" allows for adjusting the result of line width generation using the specified mask vertex group. The mask is multiplied during line width generation, allowing for the exclusion of outlines in parts where you don't want them by setting the value to 0.
Note
For example, setting the mask value of the eyelid part of a face mesh to 0 can prevent outlines from appearing on the eyelids. This eliminates the need for creating additional materials for "lineless textures," commonly used in MMD models.
Line Width by Curvature
Settings for the script-generated line width algorithm. By default, line width is thicker in areas with low curvature and thinner in areas with high curvature, achieving emphasis.
The "Sampling Method" parameter sets how curvature is sampled: "Average," "Max," or "Min." It determines whether the average, maximum, or minimum curvature (the change in normal direction among neighboring vertices) is used for evaluation.
"Average" generally produces good results. If the emphasis is too strong or too weak, trying other options might be helpful.
The "Distance Factor" parameter adjusts the evaluation scale of curvature. For example, setting it to 0.1 means that parts where the surface direction changes to the opposite within about 10cm will have a line width of 0. This means line width will be thicker in gently changing areas and thinner in detailed, bumpy areas. Adjusting according to the character's detail level and structural features allows for easily achieving roughly ideal results.
The "Power" parameter adjusts the intensity of line width changes caused by curvature. By default, it's set to 2, meaning line width changes are squared in response to curvature changes. Decreasing the value makes the change more gradual, while increasing it makes it more drastic.
The "Minimum" parameter sets the minimum line width, preventing the line width from reaching 0.
The "Invert" parameter inverts the change in line width relative to the change in curvature. This makes it possible to create line widths that are thicker on convex parts and thinner on concave parts.
Setting Colors
You can set the color for the outline.
With the "Color Source" parameter, you can choose between Texture, Freestyle, or Specified.
Selecting Texture uses the primary texture used in the material (such as a diffuse map, estimated through an algorithm), and adjusts its brightness according to the Brightness parameter to generate the outline color. In most cases, this produces the ideal line color. For materials without a texture, a grayscale color is set instead.
Choosing Freestyle uses the FreeStyle line color. This allows you to easily achieve outlines using FreeStyle line colors.
Selecting Specified lets you directly specify the outline color with the Color parameter.
The Brightness parameter is for adjusting the brightness of the texture when generating outline colors using textures. The default value of 0.5 generally produces satisfactory results, but you can adjust it as necessary.
Note
For all setting items, as long as "Update Existing" is turned off, the data that has already been set will not be changed.
VRToon World
VRToon World is a feature that changes only the background color of an object without affecting the lighting. This allows you to give a simple NPR lighting to the model while freely setting the background.
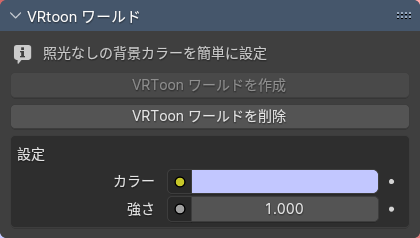
Currently, only a solid color background can be created, but more flexible background settings are planned for the future.
Toon Map Creation Feature
Implemented as a test feature, this function recreates the VRToon shader's appearance on other platforms.
When this feature is executed, an operator panel for specifying the base and shadow colors appears. By capturing the actual colors displayed in the viewport of the VRToon material, you can create a toon map based on those colors.
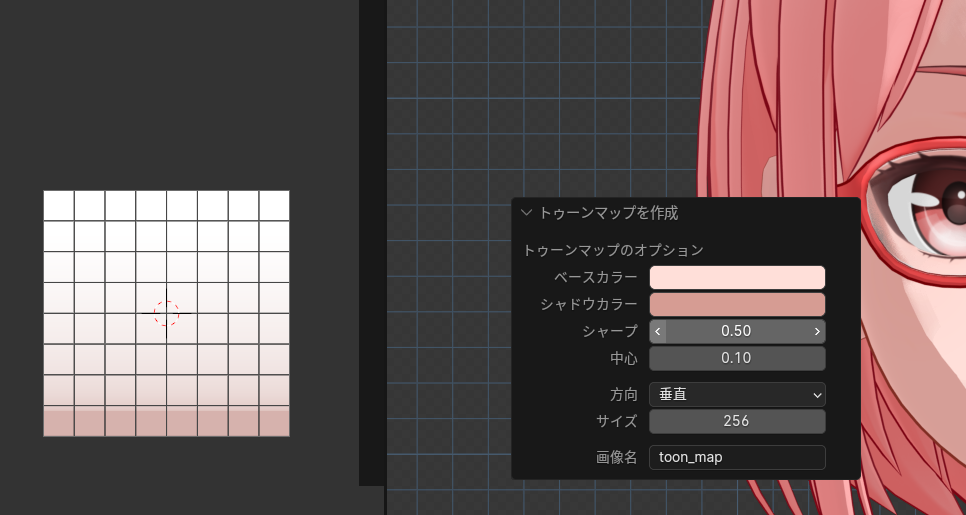
The created toon map is displayed in the image editor, so you can save or discard it as necessary.
You can select the direction of the toon map:
- Vertical: The direction of toon maps in MMD, creating a gradient from top to bottom.
- Horizontal: The direction of toon maps in some NPR shaders on Unity, such as the Unity-Chan shader.
Texture Baker (Cycles)
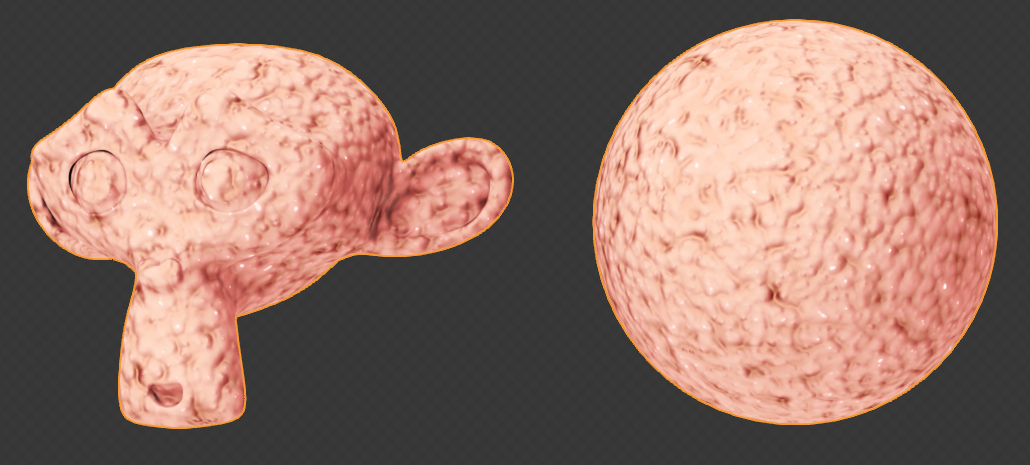
This addon includes a node tree to assist with texture baking in Cycles. This allows you to generate textures for NPR characters' skin, clothes, etc., without directly painting them.
The texture baker feature is implemented as a node group, and you need to incorporate it into the material's node tree to use it.

The most fundamental is the VRT Tex Baker node group. It includes functions for generating detailed textures based on virtual lighting, with parameter adjustments allowing for various textures.
To use it, add the VRT Tex Baker node group to the shader node editor and connect it to the output of Cycles.
Additional node groups that can expand the expressions possible when connected to VRT Tex Baker are also provided:
- VRTB Studio Light: A node group for combining lighting from three virtual lights: front, back, and below. Connect to the Base Light or Additive Light socket of VRT Tex Baker to add shadows.
- VRTB OV Hair: Generates important highlight components for anime hair textures. Use by connecting to the Overlay socket of VRT Tex Baker.
- VRTB OV Fabric: Generates textures for fabrics and clothing. Use by connecting to the Overlay socket of VRT Tex Baker.
- VRTB OV Mucous: Produces textures for mucous surfaces. Use by connecting to the Overlay socket of VRT Tex Baker.
These node groups offer a wide range of applications, so feel free to experiment with them.
Rendered Samples
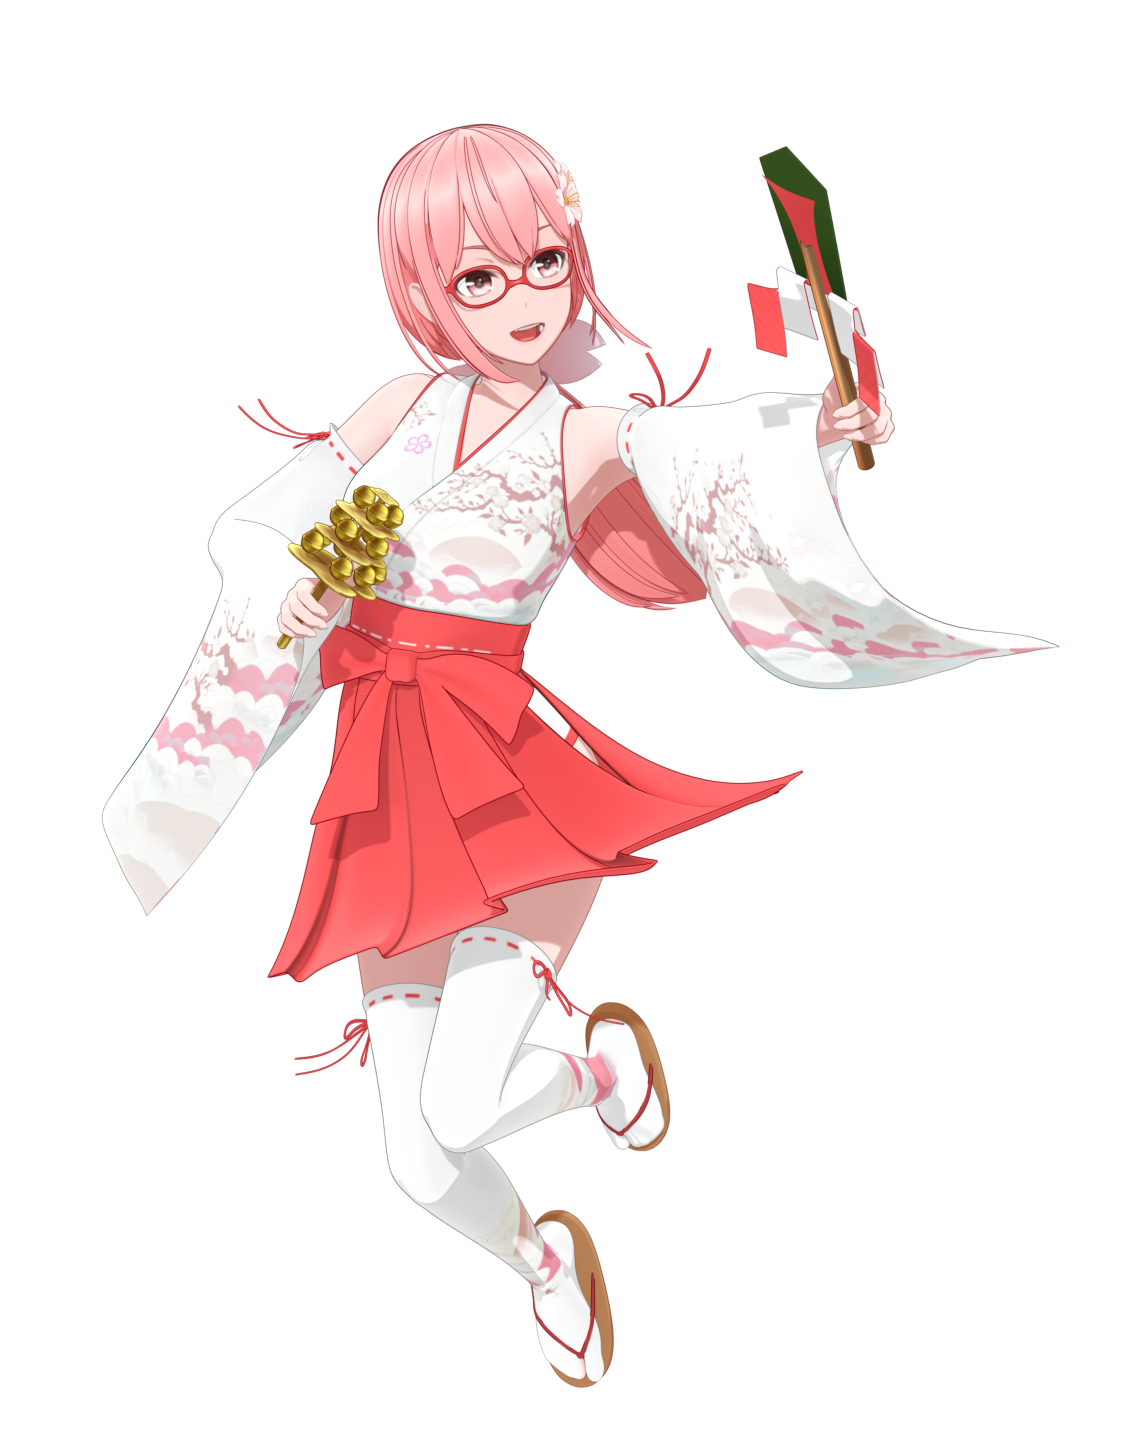
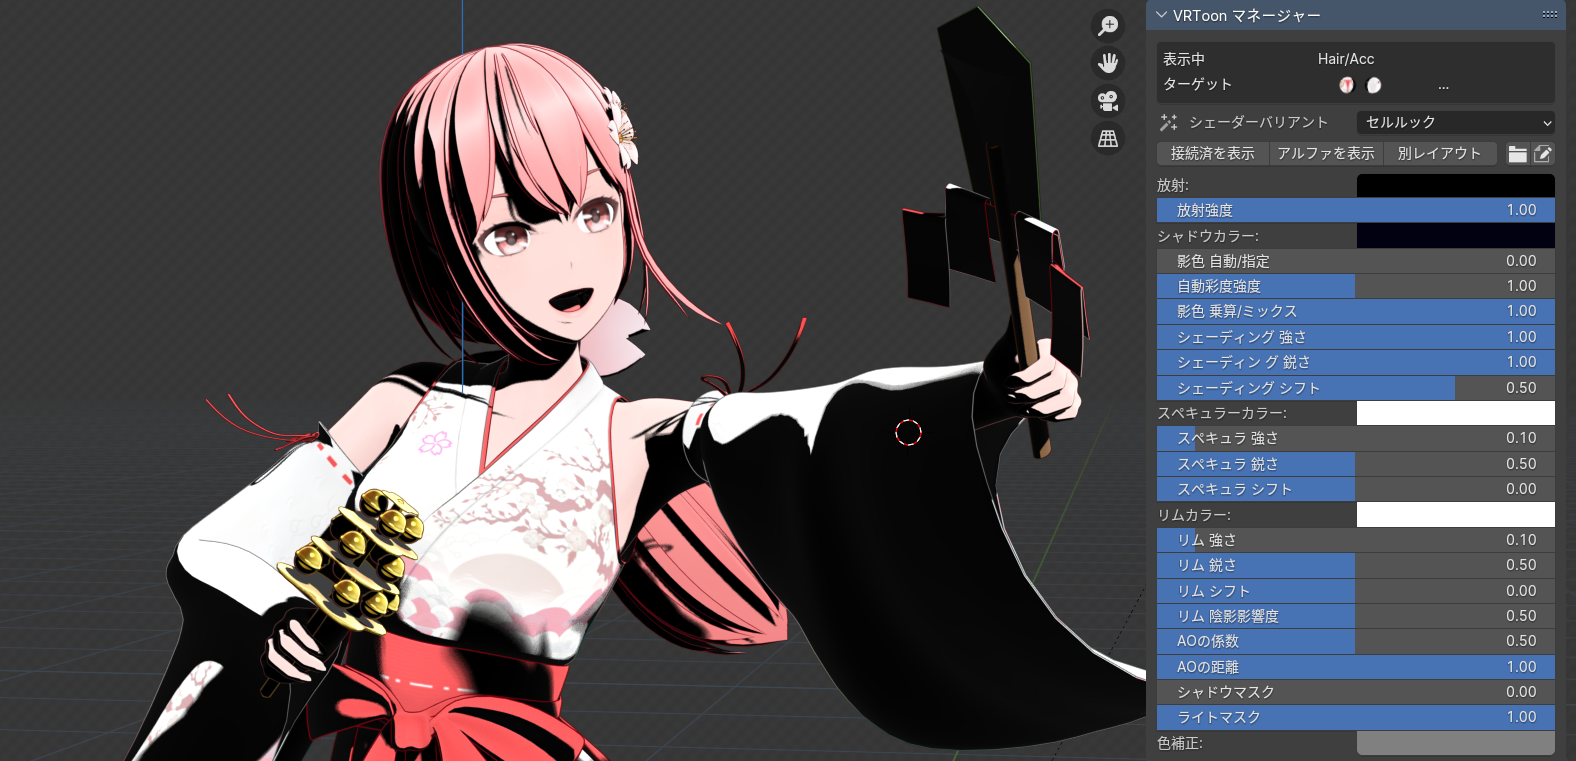
"Sakura Haru", original character by Kafuji Sato. VRToon Cel-Look
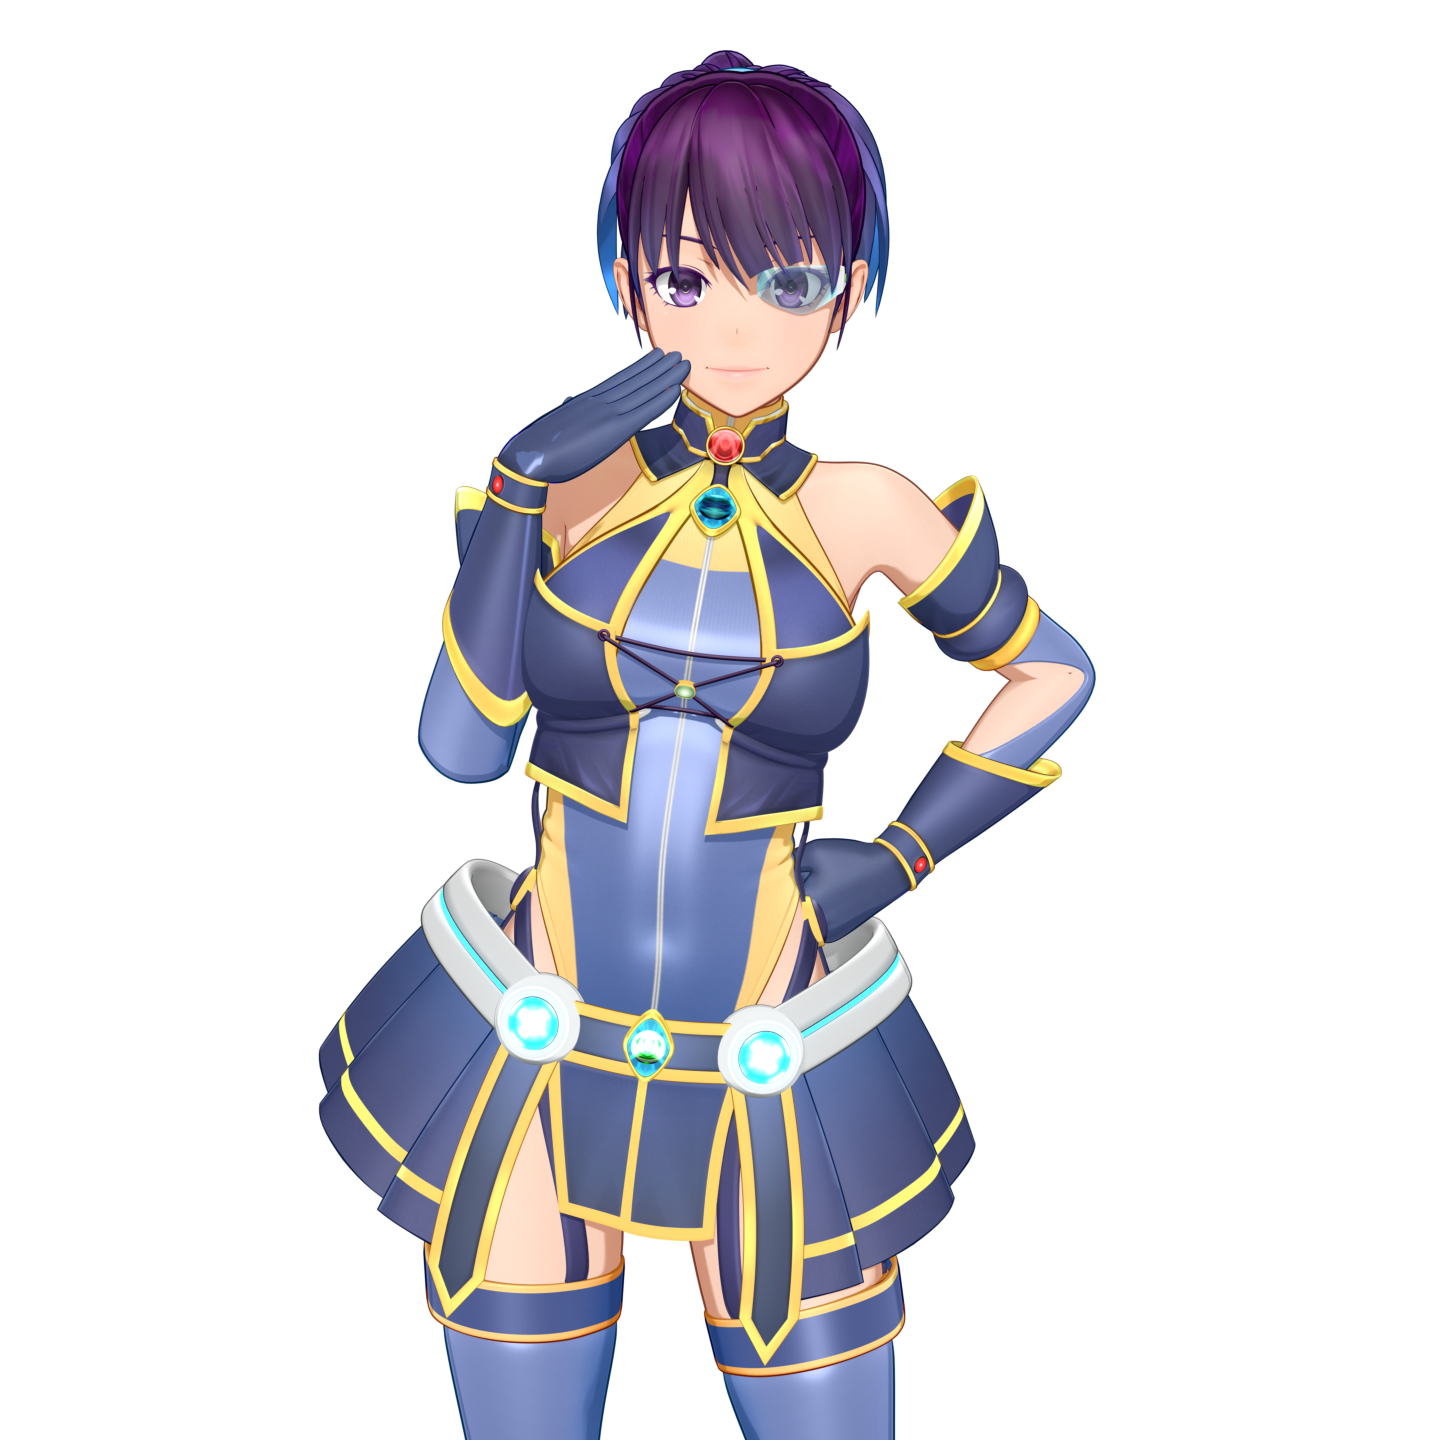
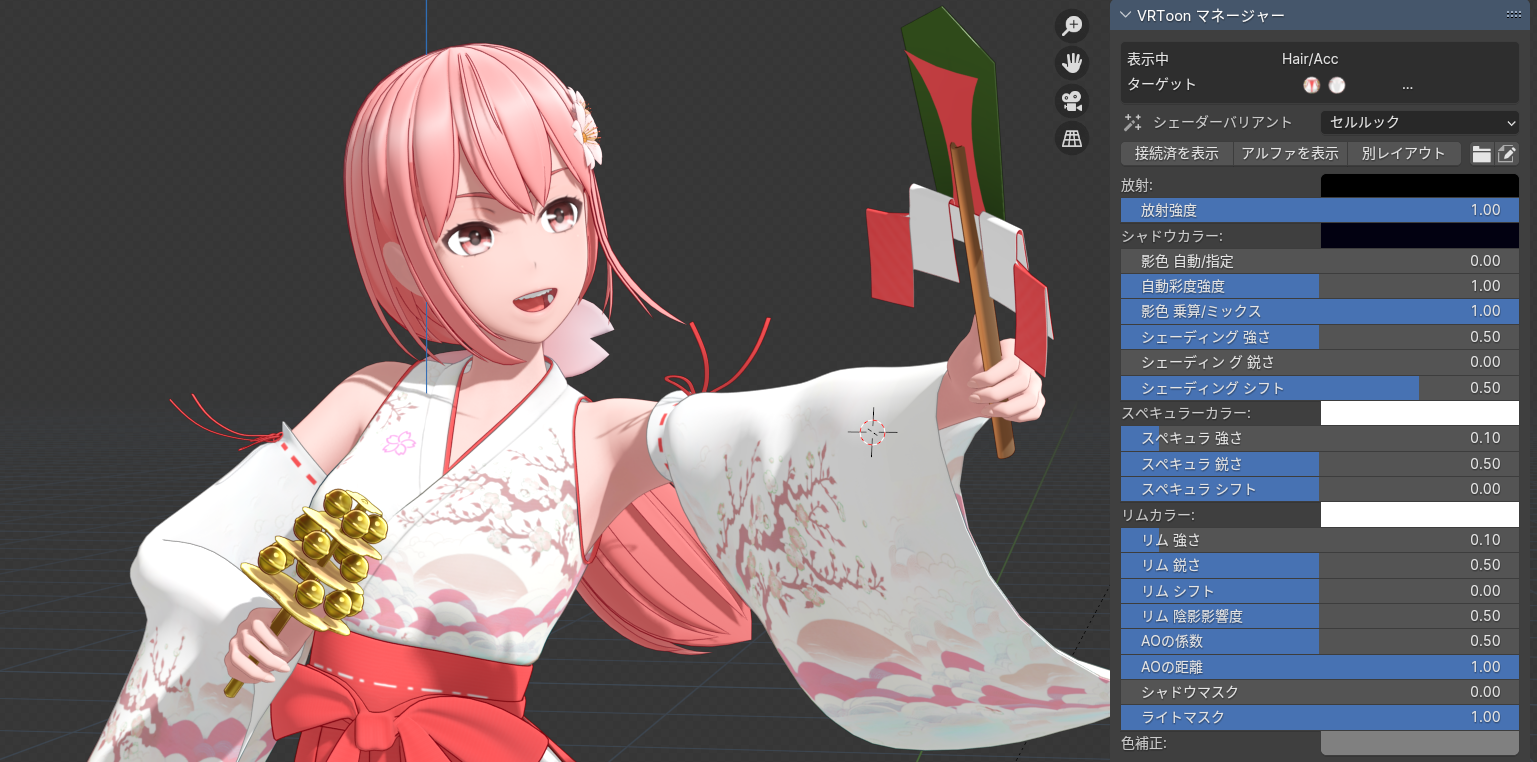
"Ryoka F Wendel v2", original character by Kafuji Sato. VRToon Cel-Look